第15篇:答题交互组件——Exam 与 SelectComponent 全解析
一、引言
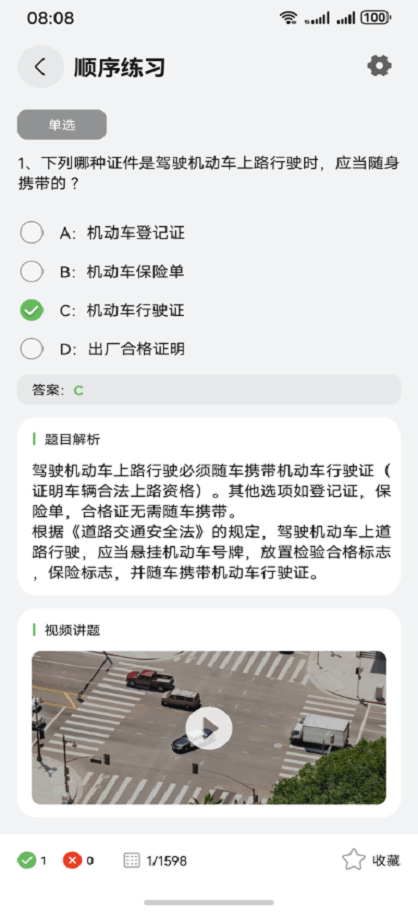
答题交互是驾考应用最核心的用户交互场景。DriverLicenseExam 项目的 Exam 组件和 SelectComponent 组件共同实现了完整的答题交互体验,包括试题展示、选项选择、答案判断、答题卡、倒计时等。本文将深入解析这两个组件的实现。
二、Exam 组件架构
2.1 组件职责
Exam 组件是考试页面的核心容器,负责:
- 管理试题列表(Swiper 滑动切换)
- 展示倒计时(模拟考试)
- 管理答题卡浮层
- 处理模拟考试结束弹窗
2.2 组件接口
1// components/exam/src/main/ets/components/Exam.ets
2@Entry
3@ComponentV2
4export struct Exam {
5  @Param @Require appPathStack: NavPathStack;  // 路由栈
6  @Param @Require examManager: ExamManager;     // 试卷数据
7  @Param mockExamCall: (score: number) => void = (score: number) => {};  // 模拟考试回调
8
9  private examController: ExamController = ExamController.instance;
10  @Local remainTime: number = 0;               // 剩余时间
11  @Local isShowProblemListSheet: boolean = false;  // 答题卡显示
12  @Local currentIndex: number = 0;             // 当前第几题
13  @Local isStop: boolean = false;              // 暂停状态
14  private readonly renderWindowSize: number = 2;  // 渲染窗口大小
15}
16
三、答题交互流程
3.1 试题渲染
1build() {
2  Column() {
3    // 模拟考试倒计时
4    this.showRemainTime();
5
6    // 试题列表(Swiper 滑动切换)
7    Swiper(examController.swiperController) {
8      ForEach(this.examManager.examDetails, (item: ExamDetail, examIndex: number) => {
9        Column({ space: 12 }) {
10          if (this.shouldRenderQuestion(examIndex)) {
11            SelectComponent({
12              item: item,
13              changeCorrectNum: (isAdd: boolean) => {
14                isAdd ? this.examManager.correctNumber++ : this.examManager.correctNumber--;
15              },
16            });
17          }
18        }
19      });
20    }
21    // ... 底部导航(答题卡、上一题、下一题)
22  }
23}
24
3.2 渲染窗口优化
1// 只渲染当前题附近的题目,提高大题库性能
2private readonly renderWindowSize: number = 2;
3
4shouldRenderQuestion(examIndex: number): boolean {
5  return Math.abs(examIndex - this.currentIndex) <= this.renderWindowSize;
6}
7
四、模拟考试倒计时
4.1 倒计时实现
1aboutToAppear(): void {
2  this.currentIndex = this.examManager.currentQuestionId + 1;
3
4  if (this.examManager.timeLimit !== 0) {
5    this.remainTime = this.examManager.timeLimit * 60;
6    let showDialog: boolean = true;
7
8    setInterval(() => {
9      if (showDialog && !this.isStop) {
10        if (this.remainTime >= 1) {
11          this.remainTime--;
12        } else {
13          showDialog = false;
14          this.isStop = true;
15          this.examSubmitDialog.open();
16        }
17      }
18    }, 1000);
19  }
20}
21
4.2 时间格式化
1@Builder
2showRemainTime() {
3  if (this.examManager.timeLimit !== 0) {
4    Row() {
5      Image($r('app.media.ic_time')).width(16).height(16);
6      Text(`${Math.floor(this.remainTime / 60)}:${String(this.remainTime % 60).padStart(2, '0')}`)
7        .fontSize(14)
8        .fontColor('#FF6B6B');
9    }
10  }
11}
12
五、答题卡实现
5.1 答题卡数据
1// 生成答题卡数据
2get answerCardData() {
3  return this.examManager.examDetails.map((item, index) => ({
4    index: index + 1,
5    status: item.isCorrect === undefined ? 'unanswered' :
6            item.isCorrect ? 'correct' : 'wrong',
7    isCurrent: index === this.currentIndex
8  }));
9}
10
5.2 答题卡交互
1// 底部打开答题卡浮层
2Button('答题卡')
3  .onClick(() => {
4    this.isShowProblemListSheet = true;
5  })
6  .bindSheet($$this.isShowProblemListSheet, this.answerCardSheet(), {
7    height: 400,
8    title: { title: '答题卡' },
9  });
10
六、总结
Exam 和 SelectComponent 组件的设计体现了 ArkUI 组件化的最佳实践:
- 职责分离:Exam 管理流程,SelectComponent 管理交互
- 性能优化:渲染窗口机制减少不必要的渲染
- 状态管理:@Local 管理内部状态,@Param 接收外部数据
- 用户体验:倒计时、答题卡、弹窗等交互细节
关键源码文件:
components/exam/src/main/ets/components/Exam.ets— 考试主组件components/exam/src/main/ets/components/SelectComponent.ets— 选择组件components/exam/src/main/ets/controller/ExamController.ets— 考试控制器
《鸿蒙掌上驾考宝典应用开发15:答题交互组件——Exam 与 SelectComponent 全解析》 是转载文章,点击查看原文。


