前言
欢迎加入开源鸿蒙跨平台社区:https://openharmonycrossplatform.csdn.net
本文将围绕 apple_product_name 的实际 API,从 Future 基础到全局错误兜底,给出一套完整的异步调用与错误处理方案。
先给出结论式摘要:
- 所有 API 返回 Future:
getMachineId()、getProductName()、lookup()都是异步的,必须await或.then() - 三类异常要分层捕获:
PlatformException(原生错误)→MissingPluginException(插件未注册)→ 通用catch(兜底) - 生产环境必备:超时控制 + 重试机制 + 全局错误处理器,缺一不可
提示:本文代码基于 apple_product_name 库的实际源码,建议对照阅读。
目录
- Future 异步模式与 API 设计
- async/await 顺序调用
- Future.wait 并行调用优化
- PlatformException 处理
- MissingPluginException 处理
- 完整异常分层捕获模式
- 原生侧错误处理机制
- 超时控制
- 重试机制与退避策略
- FutureBuilder 状态管理
- ErrorBoundary 错误边界封装
- 全局错误处理器
- Result 模式最佳实践
- 错误处理策略选型指南
- 总结
一、Future 异步模式与 API 设计
1.1 为什么所有 API 都返回 Future
1Future<String> getMachineId() async {
2  final String? machineId = await _channel.invokeMethod('getMachineId');
3  return machineId ?? 'Unknown';
4}
5
6Future<String> getProductName() async {
7  final String? productName = await _channel.invokeMethod('getProductName');
8  return productName ?? 'Unknown';
9}
10
11Future<String> lookup(String machineId) async {
12  final String? productName = await _channel.invokeMethod('lookup', {
13    'machineId': machineId,
14  });
15  return productName ?? machineId;
16}
17
apple_product_name 的三个公开方法全部返回 Future<String>,这不是设计选择,而是 MethodChannel 的通信机制决定的。invokeMethod 发出消息后,Dart 侧不会阻塞等待,而是立即返回一个 Future,原生侧处理完毕后通过 result.success() 或 result.error() 回传结果,Future 才会完成。
1.2 三个 API 的异步特征对比
| API | 参数 | 原生侧操作 | 典型耗时 | 失败概率 |
|---|---|---|---|---|
| getMachineId() | 无 | 读取 deviceInfo.productModel | < 1ms | 极低 |
| getProductName() | 无 | 查映射表 + 读 marketName | < 1ms | 极低 |
| lookup(machineId) | String | 查映射表 | < 1ms | 低(参数为空时报错) |
提示:虽然这三个方法的原生侧执行都是瞬时的,但 MethodChannel 通信本身有固定开销(序列化 + 线程切换),实测约 1-3ms。在高频调用场景下需要注意缓存。
1.3 空值降级策略
三个方法都使用了空合并运算符 ?? 做降级:
getMachineId():原生返回 null → 降级为'Unknown'getProductName():原生返回 null → 降级为'Unknown'lookup():原生返回 null(映射表未命中)→ 降级为传入的machineId原值
这种设计保证了调用方永远不会收到 null,简化了上层代码的处理逻辑。
二、async/await 顺序调用
2.1 基本用法
1Future<void> loadDeviceInfo() async {
2  final machineId = await OhosProductName().getMachineId();
3  final productName = await OhosProductName().getProductName();
4
5  print('型号标识: $machineId');
6  print('产品名称: $productName');
7}
8
async/await 将异步代码写成同步风格,可读性好。两个 await 是顺序执行的——第一个完成后才发起第二个。
2.2 顺序调用的时序
| 步骤 | 操作 | 耗时 |
|---|---|---|
| 1 | invokeMethod('getMachineId') 发出 | ~0ms |
| 2 | 等待原生侧返回 machineId | ~2ms |
| 3 | invokeMethod('getProductName') 发出 | ~0ms |
| 4 | 等待原生侧返回 productName | ~2ms |
| 总计 | ~4ms |
注意:
await不会阻塞 UI 线程。它只是暂停当前async函数的执行,Flutter 事件循环照常运转,用户交互和动画不受影响。
2.3 什么时候用顺序调用
顺序调用适合以下场景:
- 后一个调用依赖前一个的结果(比如先获取 machineId,再用它 lookup)
- 调用次数少,总耗时可接受
- 需要按顺序处理结果
三、Future.wait 并行调用优化
3.1 并行调用实现
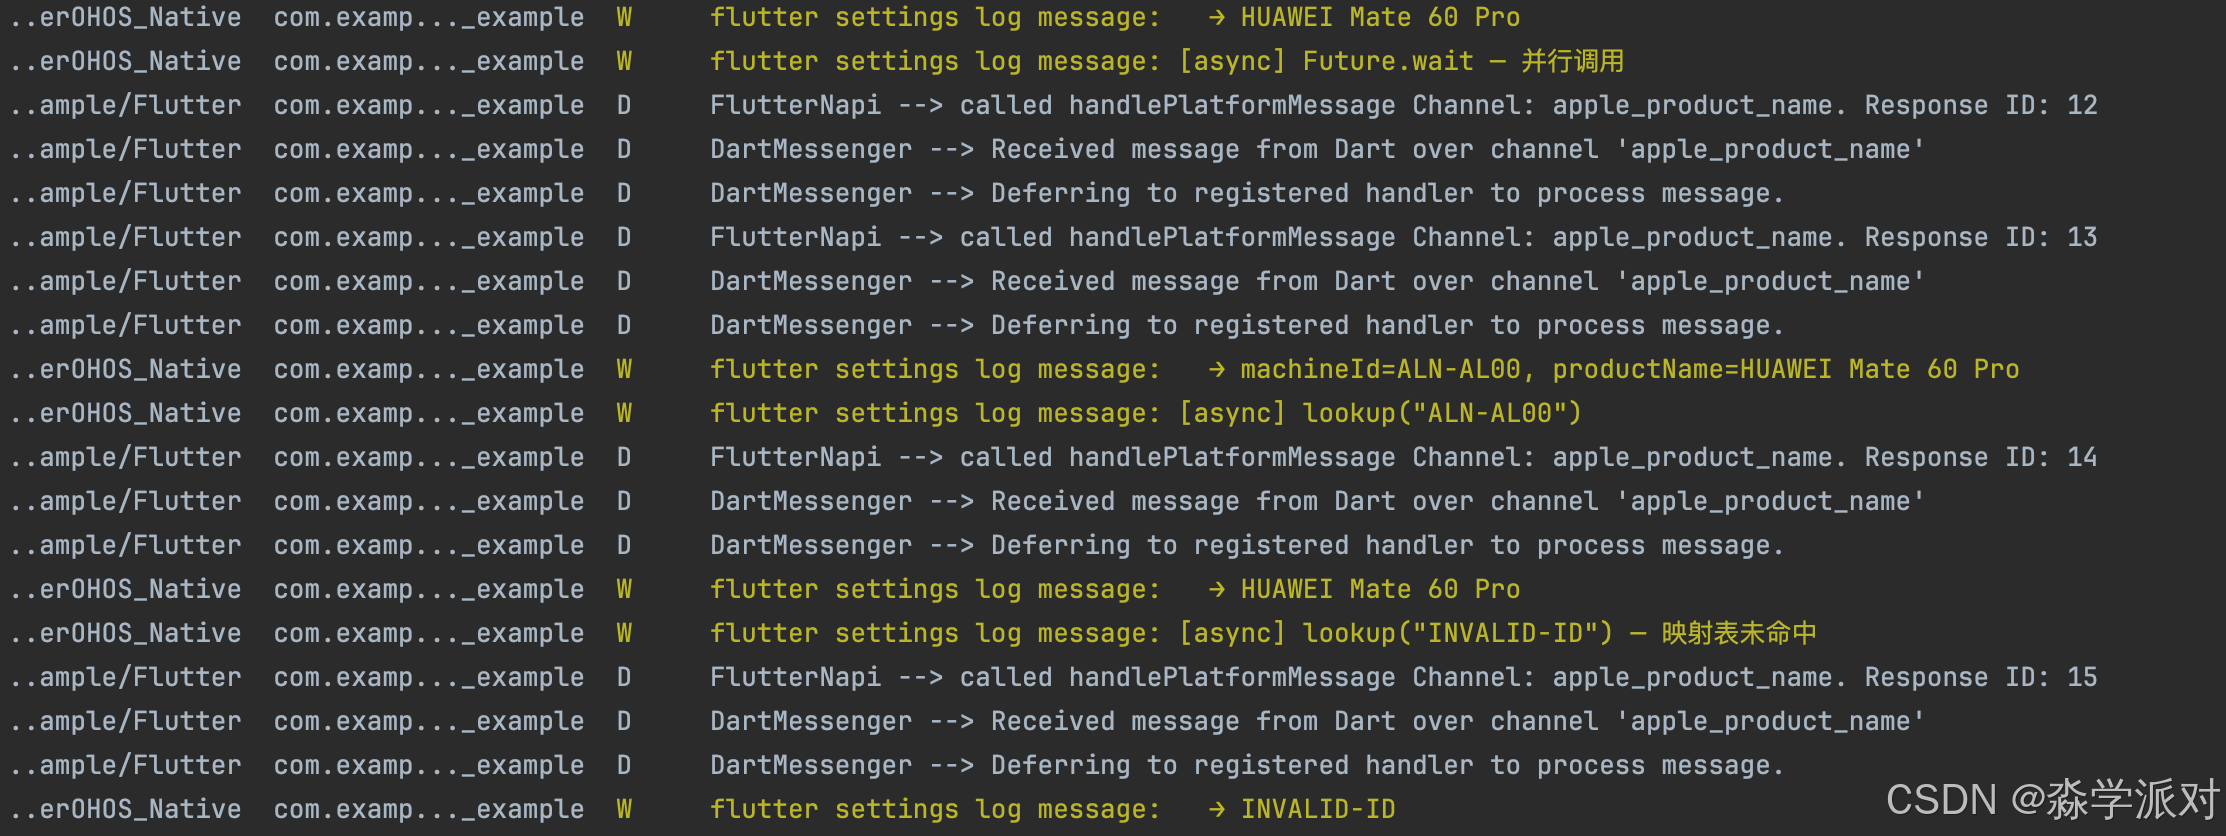
1Future<Map<String, String>> loadAllInfo() async {
2  final ohos = OhosProductName();
3
4  final results = await Future.wait([
5    ohos.getMachineId(),
6    ohos.getProductName(),
7  ]);
8
9  return {
10    'machineId': results[0],
11    'productName': results[1],
12  };
13}
14
Future.wait 同时发起多个异步调用,等全部完成后返回结果列表。顺序与传入的 Future 列表一致。
3.2 并行 vs 顺序性能对比
| 调用方式 | 总耗时 | 适用场景 |
|---|---|---|
| 顺序 await | T1 + T2 + … + Tn | 调用间有依赖 |
| Future.wait | max(T1, T2, …, Tn) | 调用间无依赖 |
对于 apple_product_name 的场景,getMachineId 和 getProductName 互不依赖,用 Future.wait 可以将总耗时从 ~4ms 降到 ~2ms。
3.3 Future.wait 的错误行为
1// 如果任一 Future 失败,整个 Future.wait 都会失败
2try {
3  final results = await Future.wait([
4    ohos.getMachineId(),
5    ohos.getProductName(),
6  ]);
7} catch (e) {
8  // 只能捕获到第一个失败的异常
9  print('并行调用失败: $e');
10}
11
注意:
Future.wait默认行为是快速失败——任一 Future 抛异常,整个 wait 立即失败。如果需要获取所有结果(包括失败的),可以对每个 Future 单独 try-catch 后再传入 wait。
四、PlatformException 处理
4.1 什么时候会抛出 PlatformException
当原生侧调用 result.error(code, message, details) 时,Dart 侧会收到 PlatformException。在 apple_product_name 中,以下场景会触发:
1// 原生侧 - getMachineId 出错
2result.error("GET_MACHINE_ID_ERROR", errorMsg, null);
3
4// 原生侧 - getProductName 出错
5result.error("GET_PRODUCT_NAME_ERROR", errorMsg, null);
6
7// 原生侧 - lookup 参数为空
8result.error("INVALID_ARGUMENT", "machineId is required", null);
9
10// 原生侧 - lookup 执行异常
11result.error("LOOKUP_ERROR", errorMsg, null);
12
4.2 Dart 侧捕获与处理
1Future<String> safeGetMachineId() async {
2  try {
3    return await OhosProductName().getMachineId();
4  } on PlatformException catch (e) {
5    print('错误码: ${e.code}');
6    print('错误信息: ${e.message}');
7    print('详细信息: ${e.details}');
8    return 'Error: ${e.code}';
9  }
10}
11
4.3 错误码与处理策略
| 错误码 | 含义 | 建议处理 |
|---|---|---|
| GET_MACHINE_ID_ERROR | 读取设备型号失败 | 返回 'Unknown' 降级 |
| GET_PRODUCT_NAME_ERROR | 获取产品名称失败 | 返回 'Unknown' 降级 |
| INVALID_ARGUMENT | lookup 参数为空 | 检查调用方传参 |
| LOOKUP_ERROR | 映射表查找异常 | 返回原始 machineId |
提示:
PlatformException的三个字段中,code用于程序化判断,message用于日志记录,details可携带堆栈等调试信息。详见 PlatformException class。
五、MissingPluginException 处理
5.1 触发条件
1Future<String> safeGetProductName() async {
2  try {
3    return await OhosProductName().getProductName();
4  } on MissingPluginException {
5    print('插件未注册,请检查 GeneratedPluginRegistrant');
6    return 'Plugin Not Found';
7  }
8}
9
MissingPluginException 在以下情况下抛出:
- 插件原生侧未注册到 Flutter 引擎(
GeneratedPluginRegistrant缺失或未执行) - 通道名 Dart 侧与原生侧不一致
- 原生侧
onMethodCall中调用了result.notImplemented() - 热重载后插件注册状态丢失
5.2 排查步骤
- 检查
GeneratedPluginRegistrant.ets是否包含AppleProductNamePlugin的注册 - 逐字比对通道名:Dart 侧
'apple_product_name'vs 原生侧"apple_product_name" - 确认
onMethodCall的switch分支覆盖了调用的方法名 - 尝试全量重启(非热重载)
注意:
MissingPluginException在生产环境中出现通常意味着严重的配置问题,应立即上报。详见 MissingPluginException class。
六、完整异常分层捕获模式
6.1 推荐模板
1Future<String> robustGetProductName() async {
2  try {
3    return await OhosProductName().getProductName();
4  } on PlatformException catch (e) {
5    // 第一层:原生侧主动返回的业务错误
6    _logError('PlatformException', e.code, e.message);
7    return 'Error: ${e.code}';
8  } on MissingPluginException {
9    // 第二层:插件配置问题
10    _logError('MissingPluginException', 'PLUGIN_NOT_FOUND', null);
11    return 'Plugin Not Registered';
12  } on TimeoutException {
13    // 第三层:超时(需配合 .timeout() 使用)
14    _logError('TimeoutException', 'TIMEOUT', null);
15    return 'Request Timeout';
16  } catch (e) {
17    // 第四层:兜底,捕获所有未预期异常
18    _logError('UnknownException', 'UNKNOWN', e.toString());
19    return 'Unknown Error';
20  }
21}
22
23void _logError(String type, String? code, String? message) {
24  print('[$type] code=$code, message=$message');
25}
26
6.2 分层捕获的设计原则
异常捕获的顺序从具体到通用,这是 Dart 异常处理的基本原则:
| 层级 | 异常类型 | 来源 | 可恢复性 |
|---|---|---|---|
| 第一层 | PlatformException | 原生侧 result.error() | 高(可根据错误码降级) |
| 第二层 | MissingPluginException | 插件未注册 / 方法未实现 | 低(配置问题) |
| 第三层 | TimeoutException | .timeout() 超时 | 中(可重试) |
| 第四层 | catch (e) | 其他未预期异常 | 未知 |
6.3 每层都要做两件事
- 记录日志:错误类型 + 错误码 + 错误信息,便于排查
- 返回降级值:保证调用方不会收到异常,UI 不会崩溃
提示:不要在
catch块中只写
七、原生侧错误处理机制
7.1 apple_product_name 的原生侧实现
1private getMachineId(result: MethodResult): void {
2  try {
3    result.success(deviceInfo.productModel);
4  } catch (e) {
5    const errorMsg = e instanceof Error ? e.message : String(e);
6    result.error("GET_MACHINE_ID_ERROR", errorMsg, null);
7  }
8}
9
10private getProductName(result: MethodResult): void {
11  try {
12    const model = deviceInfo.productModel;
13    let productName = HUAWEI_DEVICE_MAP[model];
14    if (!productName) {
15      productName = deviceInfo.marketName || model;
16    }
17    result.success(productName);
18  } catch (e) {
19    const errorMsg = e instanceof Error ? e.message : String(e);
20    result.error("GET_PRODUCT_NAME_ERROR", errorMsg, null);
21  }
22}
23
24private lookup(call: MethodCall, result: MethodResult): void {
25  try {
26    const machineId = call.argument("machineId") as string;
27    if (!machineId) {
28      result.error("INVALID_ARGUMENT", "machineId is required", null);
29      return;
30    }
31    const productName = HUAWEI_DEVICE_MAP[machineId];
32    result.success(productName);
33  } catch (e) {
34    const errorMsg = e instanceof Error ? e.message : String(e);
35    result.error("LOOKUP_ERROR", errorMsg, null);
36  }
37}
38
7.2 原生侧错误处理的核心原则
三个方法都遵循相同的模式:
- try-catch 包裹全部逻辑:防止未捕获异常导致原生侧崩溃
- 异常类型判断:
e instanceof Error ? e.message : String(e),兼容不同异常类型 - 参数校验前置:
lookup方法先校验machineId是否为空,再执行业务逻辑 - result 必须调用:每个分支都保证调用
result.success()或result.error()
7.3 result 调用的铁律
| 规则 | 违反后果 |
|---|---|
| 每次 onMethodCall 必须调用 result | Dart 侧 Future 永远挂起 |
| 每次 onMethodCall 只能调用一次 result | 运行时异常 |
| catch 块中也要调用 result.error() | 否则异常场景下 Future 挂起 |
注意:这是 MethodChannel 最容易踩的坑。如果你发现 Dart 侧的
await永远不返回,第一时间检查原生侧是否所有分支都调用了 result。
八、超时控制
8.1 基本超时设置
1import 'dart:async';
2
3Future<String> getProductNameWithTimeout() async {
4  try {
5    return await OhosProductName()
6        .getProductName()
7        .timeout(const Duration(seconds: 5));
8  } on TimeoutException {
9    return 'Timeout';
10  } on PlatformException catch (e) {
11    return 'Error: ${e.code}';
12  }
13}
14
Dart 的 Future.timeout() 为任意异步操作设置最大等待时间。超时后抛出 TimeoutException,原始 Future 的结果会被丢弃。
8.2 超时时间选择建议
| 场景 | 建议超时 | 理由 |
|---|---|---|
| getMachineId / getProductName | 3-5 秒 | 正常 < 5ms,超时说明有严重问题 |
| lookup | 3-5 秒 | 同上 |
| 批量查询(多次 lookup) | 10 秒 | 多次通信累积 |
| 应用启动时获取设备信息 | 5 秒 | 不能让启动流程卡太久 |
8.3 超时 + 降级组合
1Future<String> getDeviceNameSafe() async {
2  try {
3    return await OhosProductName()
4        .getProductName()
5        .timeout(const Duration(seconds: 3));
6  } catch (_) {
7    // 超时或任何错误都降级为系统默认值
8    return 'OpenHarmony Device';
9  }
10}
11
提示:超时时间不宜设太短。MethodChannel 通信虽然通常毫秒级完成,但设备负载高时可能偶尔延迟。建议设为正常耗时的 500-1000 倍。
九、重试机制与退避策略
9.1 带指数退避的重试
1Future<String> getProductNameWithRetry({int maxRetries = 3}) async {
2  int attempts = 0;
3
4  while (attempts < maxRetries) {
5    try {
6      return await OhosProductName()
7          .getProductName()
8          .timeout(const Duration(seconds: 3));
9    } catch (e) {
10      attempts++;
11      print('第 $attempts 次尝试失败: $e');
12
13      if (attempts >= maxRetries) {
14        return 'Failed after $maxRetries attempts';
15      }
16
17      // 指数退避:100ms → 200ms → 400ms
18      await Future.delayed(
19        Duration(milliseconds: 100 * (1 << (attempts - 1))),
20      );
21    }
22  }
23
24  return 'Unknown';
25}
26
9.2 退避策略对比
| 策略 | 等待时间 | 适用场景 |
|---|---|---|
| 固定间隔 | 100ms, 100ms, 100ms | 简单场景 |
| 线性退避 | 100ms, 200ms, 300ms | 一般场景 |
| 指数退避 | 100ms, 200ms, 400ms | 推荐,给系统更多恢复时间 |
9.3 哪些异常值得重试
不是所有异常都应该重试:
- 值得重试:
TimeoutException(临时性)、部分PlatformException(原生侧临时不可用) - 不值得重试:
MissingPluginException(配置问题,重试无意义)、INVALID_ARGUMENT(参数错误,重试结果一样)
1Future<String> smartRetry() async {
2  for (int i = 0; i < 3; i++) {
3    try {
4      return await OhosProductName().getProductName();
5    } on MissingPluginException {
6      // 配置问题,直接放弃
7      return 'Plugin Not Found';
8    } on TimeoutException {
9      // 超时,值得重试
10      if (i == 2) return 'Timeout';
11      await Future.delayed(Duration(milliseconds: 100 * (1 << i)));
12    } catch (e) {
13      if (i == 2) return 'Error';
14      await Future.delayed(Duration(milliseconds: 100 * (1 << i)));
15    }
16  }
17  return 'Unknown';
18}
19
注意:重试次数不宜过多。3 次是经验值——覆盖大部分临时性故障,又不会让用户等太久。
十、FutureBuilder 状态管理
10.1 基本用法
1class DeviceInfoWidget extends StatelessWidget { 2 3 Widget build(BuildContext context) { 4 return FutureBuilder<String>( 5 future: OhosProductName().getProductName(), 6 builder: (context, snapshot) { 7 if (snapshot.connectionState == ConnectionState.waiting) { 8 return const CircularProgressIndicator(); 9 } 10 if (snapshot.hasError) { 11 return Text('加载失败: ${snapshot.error}'); 12 } 13 return Text('设备: ${snapshot.data}'); 14 }, 15 ); 16 } 17} 18
FutureBuilder 自动监听 Future 的三种状态(等待中 / 成功 / 失败),触发 UI 重建。不需要手动 setState。
10.2 FutureBuilder 的三种状态
| snapshot 状态 | 含义 | UI 建议 |
|---|---|---|
| connectionState == waiting | Future 未完成 | 显示 loading 指示器 |
| hasError == true | Future 抛出异常 | 显示错误提示 + 重试按钮 |
| hasData == true | Future 正常完成 | 渲染数据 |
10.3 避免重复调用的陷阱
1// ❌ 错误:每次 build 都创建新 Future,导致重复调用 2class BadExample extends StatelessWidget { 3 4 Widget build(BuildContext context) { 5 return FutureBuilder<String>( 6 future: OhosProductName().getProductName(), // 每次 build 都会重新调用 7 builder: (context, snapshot) => Text('${snapshot.data}'), 8 ); 9 } 10} 11 12// ✅ 正确:在 initState 中创建 Future,缓存结果 13class GoodExample extends StatefulWidget { 14 15 State<GoodExample> createState() => _GoodExampleState(); 16} 17 18class _GoodExampleState extends State<GoodExample> { 19 late final Future<String> _future; 20 21 22 void initState() { 23 super.initState(); 24 _future = OhosProductName().getProductName(); 25 } 26 27 28 Widget build(BuildContext context) { 29 return FutureBuilder<String>( 30 future: _future, 31 builder: (context, snapshot) => Text('${snapshot.data}'), 32 ); 33 } 34} 35
提示:
FutureBuilder在 Widget 重建时会比较 Future 引用。如果每次传入新的 Future 实例,就会重新订阅,触发不必要的重复请求。详见 FutureBuilder class。
十一、ErrorBoundary 错误边界封装
11.1 通用错误边界组件
1class ErrorBoundary extends StatelessWidget { 2 final Future<String> future; 3 final Widget Function(String data) onSuccess; 4 final Widget Function(Object error) onError; 5 final Widget loading; 6 7 const ErrorBoundary({ 8 required this.future, 9 required this.onSuccess, 10 required this.onError, 11 this.loading = const CircularProgressIndicator(), 12 }); 13 14 15 Widget build(BuildContext context) { 16 return FutureBuilder<String>( 17 future: future, 18 builder: (context, snapshot) { 19 if (snapshot.connectionState == ConnectionState.waiting) { 20 return loading; 21 } 22 if (snapshot.hasError) { 23 return onError(snapshot.error!); 24 } 25 return onSuccess(snapshot.data ?? 'Unknown'); 26 }, 27 ); 28 } 29} 30
11.2 使用示例
1ErrorBoundary(
2  future: OhosProductName().getProductName(),
3  onSuccess: (name) => Text('设备: $name'),
4  onError: (error) => Column(
5    children: [
6      Text('加载失败'),
7      ElevatedButton(
8        onPressed: () { /* 重试逻辑 */ },
9        child: Text('重试'),
10      ),
11    ],
12  ),
13)
14
封装的好处:
- 消除重复的
FutureBuilder状态判断代码 - 统一错误 UI 风格
- 方便扩展(加重试、加动画、加错误上报)
十二、全局错误处理器
12.1 初始化全局错误捕获
1void main() {
2  // 初始化全局错误处理
3  FlutterError.onError = (details) {
4    print('Flutter Error: ${details.exception}');
5    // 上报到错误监控平台
6  };
7
8  PlatformDispatcher.instance.onError = (error, stack) {
9    print('Uncaught Error: $error');
10    // 上报到错误监控平台
11    return true; // 返回 true 表示已处理
12  };
13
14  runApp(const MyApp());
15}
16
12.2 两个全局捕获点的分工
| 捕获点 | 捕获范围 | 典型场景 |
|---|---|---|
| FlutterError.onError | Flutter 框架层同步错误 | Widget build 异常、布局错误 |
| PlatformDispatcher.instance.onError | 所有未处理的异步错误 | 未 catch 的 Future 异常 |
12.3 与局部 try-catch 的关系
全局错误处理器是最后一道防线,不是替代品:
- 优先用局部 try-catch:在每个 API 调用处精确处理,提供降级值
- 全局兜底:捕获遗漏的异常,防止应用崩溃
- 错误上报:全局处理器中统一上报,便于监控
提示:建议在
main()函数的最开头初始化全局错误处理器,确保应用启动阶段的异常也能被捕获。关于 Flutter 错误处理的完整指南,参考 Handling errors in Flutter。
十三、Result 模式最佳实践
13.1 Result 容器定义
1class Result<T> {
2  final T? data;
3  final DeviceError? error;
4
5  Result.success(this.data) : error = null;
6  Result.failure(this.error) : data = null;
7
8  bool get isSuccess => error == null;
9}
10
11class DeviceError {
12  final String code;
13  final String message;
14
15  DeviceError(this.code, this.message);
16
17  factory DeviceError.platform(String? code, String? msg) =>
18      DeviceError(code ?? 'PLATFORM', msg ?? 'Platform error');
19  factory DeviceError.pluginNotFound() =>
20      DeviceError('PLUGIN_NOT_FOUND', 'Plugin not registered');
21  factory DeviceError.timeout() =>
22      DeviceError('TIMEOUT', 'Request timeout');
23  factory DeviceError.unknown(String msg) =>
24      DeviceError('UNKNOWN', msg);
25}
26
13.2 Service 层封装
1class DeviceInfoService {
2  final OhosProductName _ohos = OhosProductName();
3
4  Future<Result<String>> getProductName() async {
5    try {
6      final name = await _ohos.getProductName()
7          .timeout(const Duration(seconds: 5));
8      return Result.success(name);
9    } on PlatformException catch (e) {
10      return Result.failure(DeviceError.platform(e.code, e.message));
11    } on MissingPluginException {
12      return Result.failure(DeviceError.pluginNotFound());
13    } on TimeoutException {
14      return Result.failure(DeviceError.timeout());
15    } catch (e) {
16      return Result.failure(DeviceError.unknown(e.toString()));
17    }
18  }
19}
20
13.3 调用方使用
1final service = DeviceInfoService();
2final result = await service.getProductName();
3
4if (result.isSuccess) {
5  print('设备名称: ${result.data}');
6} else {
7  print('获取失败: ${result.error!.code} - ${result.error!.message}');
8}
9
Result 模式的核心优势:
- 错误变成返回值:调用方不需要 try-catch,通过
isSuccess判断即可 - 类型安全:编译器能检查是否处理了错误分支
- Service 层封装异常:上层代码完全不感知底层的异常类型
提示:Result 模式在 Rust、Kotlin 等语言中是标准做法。Dart 社区也有 dartz 和 fpdart 等函数式编程库提供类似的
Either类型。
十四、错误处理策略选型指南
14.1 不同场景的推荐策略
| 场景 | 推荐策略 | 理由 |
|---|---|---|
| 简单 Demo / 原型 | 单层 try-catch + 降级值 | 快速开发,够用 |
| 生产应用 - 单次调用 | 分层 try-catch + 日志 | 精确处理不同异常 |
| 生产应用 - 关键路径 | 超时 + 重试 + 分层 catch | 最大化成功率 |
| 大型项目 - Service 层 | Result 模式 | 统一错误处理范式 |
| 全局兜底 | FlutterError.onError + PlatformDispatcher | 防止未处理异常导致崩溃 |
14.2 apple_product_name 场景的推荐组合
对于 apple_product_name 这类轻量级设备信息查询插件,推荐的组合是:
- API 调用处用分层 try-catch,覆盖
PlatformException+MissingPluginException+ 通用兜底 - 启动时获取设备信息加 3-5 秒超时
- 不需要重试(原生侧操作是瞬时的,失败通常是配置问题)
main()中初始化全局错误处理器
14.3 错误处理的度
错误处理不是越多越好:
- 过度防御:每行代码都 try-catch → 代码臃肿,可读性差
- 完全不防御:裸调用 → 一个异常就崩溃
- 恰到好处:在 MethodChannel 调用边界做防护,内部逻辑保持简洁
提示:错误处理的黄金法则——在你能做出有意义响应的地方捕获异常。如果捕获了异常却只是
rethrow,那这个 catch 就是多余的。
总结
apple_product_name 库的异步调用与错误处理涵盖了 Flutter 插件开发中最核心的稳定性保障技术。从 Future 异步模式到 async/await 顺序调用和 Future.wait 并行优化,从 PlatformException / MissingPluginException 分层捕获到超时控制和重试机制,从 FutureBuilder 状态管理到 ErrorBoundary 封装和全局错误处理器,最终收敛到 Result 模式统一错误处理范式。核心记住三点:所有 API 都是异步的、异常要分层捕获、生产环境必须有兜底。
下一篇文章将介绍华为 Mate 系列设备映射表的详细内容,敬请期待。
如果这篇文章对你有帮助,欢迎点赞👍、收藏⭐、关注🔔,你的支持是我持续创作的动力!
相关资源:
- OpenHarmony适配仓库:flutter_apple_product_name
- 开源鸿蒙跨平台社区:openharmonycrossplatform
- Flutter Platform channels:官方文档
- PlatformException:API 文档
- MissingPluginException:API 文档
- FutureBuilder:API 文档
- Flutter 错误处理指南:Handling errors in Flutter
- Dart async/await:Dart asynchronous programming
- Sentry for Flutter:官方文档
- Flutter 插件开发:Developing packages & plugins
《Flutter三方库适配OpenHarmony【apple_product_name】异步调用与错误处理》 是转载文章,点击查看原文。